It's time again for the monthly Wacky Watercooler Blog Hop! And this month I was asked to join in again! *smile* You should be arriving here from
Jean's blog. (Although I'm not so sure I like following such an incredible and creative crafter!!!) If you got lost along the way, you can always start at the beginning of the hop, by just clicking on the banner above!
As I'm already working feverishly to prepare for a craft fair next month, I thought, why not combine the two?? Make things for the fair, AND have some things to share for the hop!! Win/Win! Feel free to click on any photo to enlarge it. So without further ado...
Project #1:
Card-In-A-Box
I love that this 3D project folds completely flat and fits into a regular A2 envelope!! No extra postage - wooo hooo! The internet has been abuzz about these for a while now, but none of the tutorials I've come across had instructions for a standard sized card, or in non-metric measurements. I do not like doing math in order to craft, lol!!!
Side views
Instructions: Cut your card stock for 8 1/4" x 9". Use your scoring board to score card stock (with 9" side at the top): 2 1/8", 4 1/4", 6 3/8", and 8 1/2". Turn card stock to 8 1/4" side, and score at 2 1/4". Put card stock into your trimmer with the 2 1/4" score line on your left hand side, and cut at 5 1/2". Take the strip that you just cut off, and cut it at 3 1/8". Take that smaller strip that you just cut, and cut in half. This will be used to make the two little "z" bridges which hold up your layers of flowers inside the box. (For a video of this, click
HERE.) I only made one minor measurement change to make this card fit into our envelopes.
Recipe:
Stamps: Flower Shop, Petite Petals, Banner Blast
Paper: Daffodil Delight, Crisp Cantaloupe, Wild Wasabi, Whisper White, Watercolor Wonder DSP
Ink: Daffodil Delight, Crisp Cantaloupe
Accessories: Secret Garden framelit (leaves), Petite Petals punch, Pansy punch, Banner punch, sticky strip, Tombow multi adhesive
Project #2:
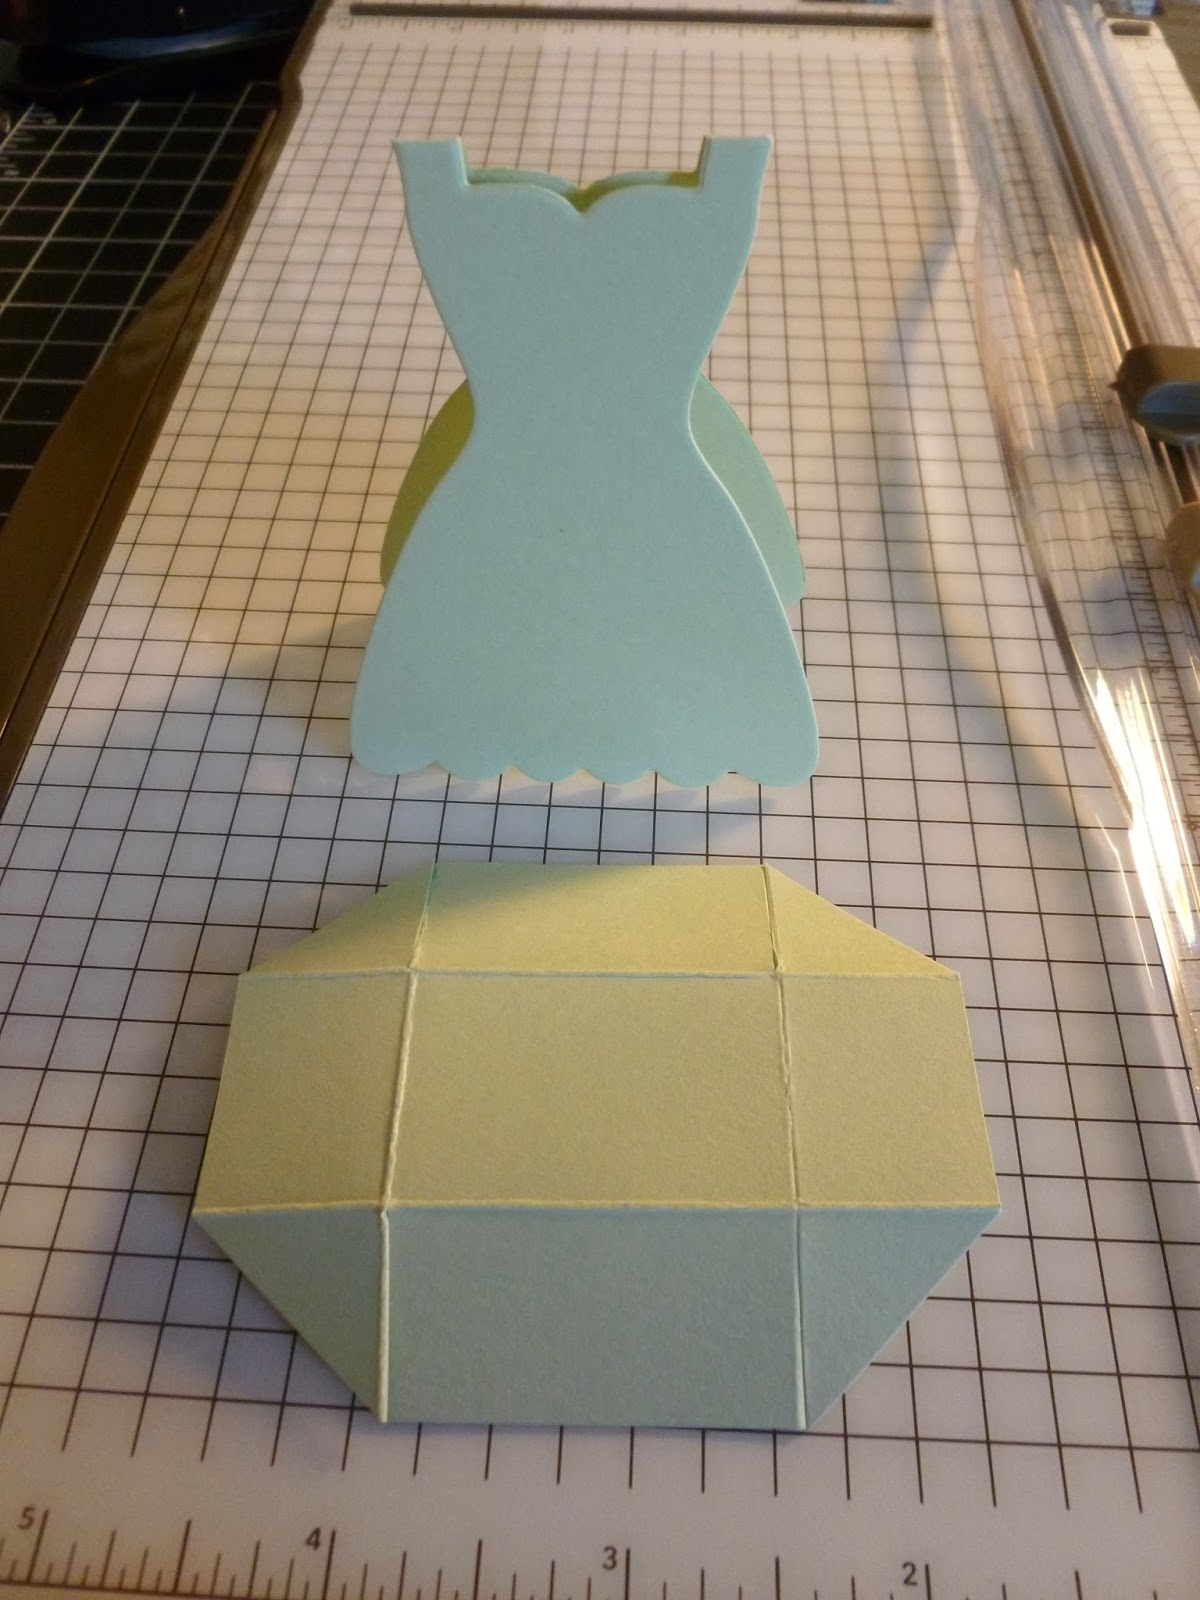
Mini Dress Boxes
Aren't these darling?? These would be perfect for bridal showers or any kind of female get-togethers! Use them as place settings!!! I will be filling these with small chocolates and claiming them as Easter dresses.
Instructions: The dress form is simple enough to make using the Dress Framelit. Take a piece of 8 1/2" x 11" card stock and cut in half, so that you have two, 8 1/2" x 5 1/2" pieces. Fold each in half (4 1/4" x 5 1/2"). Using your Big Shot, simply make sure that the top "straps" on the framelit are above the fold line so that they do not cut the paper. That will leave the fold intact. This should make two cuts from the one folded piece of card stock. For the box, cut a piece of matching card stock 3" x 2 1/2". On the 3" side, score at 3/4" and 2 1/4". On the 2 1/2" side, score at 3/4" and 1 3/4". Using the above photo as a reference, snip the appropriate sides to the score line, and then angle cut them to reduce bulk. This will make a nicely finished box! I used Tombow to attach the flaps of the box. Then place a strip of sticky strip on the two longer sides of the box in the middle. Remove the red backing, and place the box in between the front & back of the dress form, making sure it's centered left to right. Then slowly squeeze the dress together, ensuring that the hem of the dress stays flush against your work surface. It should work like a charm! Use your imagination and let loose your inner dress designer!!!


Recipe:
Stamps: None
Paper: In Color card stock (Baked Brown Sugar, Coastal Cabana, Crisp Cantaloupe, Pistachio Pudding, Strawberry Slush), Sweet Sorbet DSP, In Color DSP paper pack, gold foil vellum paper
Ink: None
Accessories: 3/8" ruffled In Color ribbon, basic rhinestones, basic pearls, bitty flower punches, sticky strip, tombow multi adhesive, Fancy Fan embossing folder, Decorative Dots embossing folder (SAB)
Project #3:
Post-It Note Holder
These have been around
forever, but when I saw this card by
Michelle LeBreton, I wanted to scale it down to fit on the front of this project. I opted to not put on the ribbon like she did, as this project works best if it remains as flat on the front as possible. For a video on making this holder, you can watch a video
HERE.
Instructions: I cut the white panel 2 1/2" x 2 1/2". Punch out two blue squares and place near the bottom of the white panel. Make the roman blind by cutting the DSP in a long 2 1/4" strip. I scored it at 1/2", then 1/8", repeat until it's long enough, approx 4 times. Cut a strip of coordinating card stock and punch with the scalloped border punch; attach at the bottom of the DSP panel. I used sticky strip to attach the DSP panel to the window panel. Then punch out flowers and arrange along the bottom edge. Add rhinestones as desired.
Recipe:
Stamps: None
Paper: Gumball Green, Soft Sky, Whisper White, Wisteria Wonder, So Saffron, Strawberry Slush, Pink Pirouette, Pear Pizzazz, Pear Pizzazz DSP
Ink: None
Accessories: 1" square punch, scalloped border punch, bitty flower punches, basic rhinestones, sticky strip, Tombow multi adhesive
I hope you've enjoyed these projects! It's fun to take "old ideas" and put your own spin on them. It's now time to visit
Christine for the next spot on our Blog Hop. Be sure to keep going, and leave lots of Comment Love!!!


.jpg)


20 comments:
I just love those little dresses! They are adorable. I'll have to make some of those for my ladies. Love all your projects (as always!)
Fabulous projects, Jeanne! (just perfect for 'case'ing :O) So glad to have you back in the Hop!
Awesome projects, Jeanne - as always. The little dress boxes are so cute. Can't wait to CASE.
Darling dresses!! What a great idea.
So glad you got talked into participating, Jeannie! Those Easter dress favors are totally fabulous!
great projects Jeanne!! Thanks for sharing and hopping!
Love all of your projects. The bright, happy colors are...well, happy. Those dresses are darling, the card in a box is pretty and I love that post it note cover. As everyone says...great for casing and I will be doing that.
Jeanne, Great projects, you pull together amazing projects.
Great to have you in the Hop again Jeanne! You certainly have been busy. Those little dresses are adorable and look like such fun to decorate. Thanks for all the measurements for your projects.
I love all the sweet details on all your projects, amazing work!
Great projects, Jeannie. The dresses are adorable. Love the card in a box. The post-it note holders have always been my big seller at craft shows.
You my friend are rockin and rollin and I am happy to see YOU blogging again.
Hi Jeannie,
Love all your projects! Your card-in-a-box is a beaut, those bright spring colors are calling to me. This hop is wonderful!
What cute projects! :) :)
Love all your projects. The card in a box is a wonderful paper flower garden - beautiful.
Marvelous 3D items! So glad you have joined in the fun.
Wonderful projects and thanks for sharing instructions!
Marvelous hop projects Miss Jeanne. Thanks for sharing the scrumptious inspiration and for extending the hops International reach to the German border.
Spring has sprung in this post for sure. Love them all - the individual dresses really show some inspiring ideas at work - but for me the post-it note holder takes the cake. A wonderful conversion of a card to a 3D interpretation. I bet these go like hotcakes at the craft fair.
So glad to see you back around the wacky watercooler again...give Thomas a hug and here's hoping you can catch up on your sleep as well as filling the craft fair shelves. Hugs - J.
Those boxes are really cool!
It's so nice to have you back in the hop, Jeanne. I love checking out your projects and this post is no exception. What a great idea for the Dress Up framelits! I'm definitely going to CASE those little boxes. When people see the versatility of framelits, they're more likely to buy. Love the card-in-a-box, too. Such great ideas. You'll sell out for sure at the Craft Fair!
Post a Comment